How to Use Curtis Coffee Maker: A Comprehensive Guide in 2023

The Curtis Coffee Maker in 2023 presents an intuitive and user-friendly experience, simplifying the art of coffee brewing. This comprehensive guide offers a step-by-step approach to utilizing the machine effectively.
From the initial unboxing and setup process to filling the water reservoir and adding coffee grounds, each step is meticulously detailed. Users can easily navigate the brewing preferences by selecting their desired brew strength and cup size, ensuring a customized coffee experience.
Once the brewing cycle commences, the machine efficiently extracts flavors and aromas to create a flavorful cup. The guide emphasizes serving etiquette, encouraging users to pour and relish the freshly brewed coffee while maintaining the coffee maker’s longevity through proper cleaning and maintenance routines.
By amalgamating simplicity with precision, this guide enables coffee aficionados and beginners alike to master the art of using the Curtis Coffee Maker, transforming each brewing session into a delightful experience filled with rich flavors and aromatic pleasures.
You Can Read More: Bugatti Coffee Maker
Wilbur Curtis Commercial Pourover Coffee Brewer 2.2L Airpot Single Coffee Brewer
Wilbur Curtis Commercial
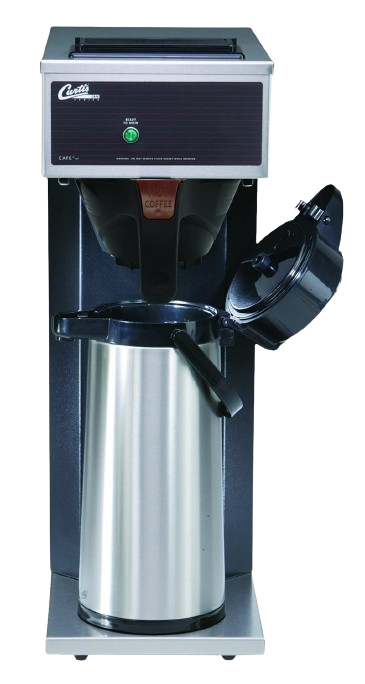
Pourover Coffee Brewer 2.2L Airpot Single Coffee Brewer
- Brand: Wilbur Curtis
- Special Feature: Thermal
- Coffee Maker Type: Pour Over
- Filter Type: Reusable
- Included Components: Brewbasket
Unboxing and Setup Process
Here’s a guide to the unboxing and setup process for the Curtis Coffee Maker:
When you receive your Curtis Coffee Maker, start by carefully unboxing it. Ensure all components, including the machine itself, accessories, and manuals, are present and undamaged.
Place the coffee maker on a stable, flat surface close to a power outlet. This ensures convenience and stability during the setup process.
Before proceeding, thoroughly read the user manual provided with the coffee maker. This manual contains essential instructions specific to your model that are crucial for a smooth setup process.
Next, remove any packaging materials or protective films from the machine, ensuring it’s clean and ready for use.
Once you’ve ensured everything is in place and the machine is clean, proceed to plug it into a power outlet. Check if the power cord is in good condition before connecting it.
Now, turn on the power switch or button on the coffee maker to initialize the setup process. Some models might have an initial setup routine or activation steps outlined in the user manual.
Follow any setup prompts or instructions displayed on the machine’s interface, if applicable. This might involve language selection, clock setup, or initial settings adjustment.
Finally, after completing the setup process, your Curtis Coffee Maker is ready for use. Proceed to the next steps of preparing the machine for brewing your favorite cup of coffee.
Remember, each model may have specific setup procedures, so always refer to the user manual provided by the manufacturer for accurate instructions tailored to your coffee maker model.
Filling and Preparing the Coffee Maker
Filling and preparing your Curtis Coffee Maker involves two primary steps: filling the water reservoir and adding coffee grounds.
Filling the Water Reservoir
- Open the Reservoir: Locate and open the water reservoir lid on the coffee maker. Ensure it’s clean and free from any debris.
- Add Fresh Water: Use fresh, cold water and pour it into the reservoir. Be cautious not to exceed the maximum fill line indicated inside the reservoir.
- Close the Lid: Once the reservoir is filled, securely close the lid, ensuring it’s properly sealed.
Adding Coffee Grounds
- Inserting the Filter: Place a coffee filter into the designated filter compartment of the coffee maker. Ensure it fits properly and sits evenly.
- Adding Coffee Grounds: Depending on your taste preferences and the desired strength, add the appropriate amount of coffee grounds into the filter. Use the manufacturer’s recommended measurements for best results.
- Adjusting Settings (if available): Some models might offer settings for brew strength or cup size. Adjust these settings according to your preferences before starting the brewing process.
Following these steps ensures your Curtis Coffee Maker is properly filled with water and coffee grounds, setting the stage for a delightful brewing experience.
Understanding the Brewing Process:
Understanding the brewing process with the Curtis Coffee Maker involves familiarizing yourself with its functionalities and steps for a seamless brewing experience.
Selecting Brewing Preferences
- Brew Strength: Determine the desired brew strength, whether you prefer a milder or stronger cup of coffee. Adjust the settings accordingly on the machine if available.
- Cup Size: Choose the cup size you intend to brew. The machine might offer options for various cup sizes, allowing customization based on your preference.
Starting the Brewing Cycle
- Power On: Turn on the coffee maker using the designated power button or switch.
- Initiating Brew: Once the settings are adjusted, start the brewing cycle. The Curtis Coffee Maker efficiently heats the water to the optimal temperature for brewing.
- Extraction Process: The brewing cycle initiates the extraction process, where hot water passes through the coffee grounds in the filter. This process extracts flavors and oils, creating a flavorful cup of coffee.
- Completion Indicators: Some models might have indicators or signals to denote the completion of the brewing cycle. Pay attention to these cues for an optimal brewing experience.
Serving the Brew
- Brew Completion: Once the brewing cycle is complete, carefully pour the brewed coffee into your cup or carafe.
- Enjoying the Coffee: Savor the rich aroma and flavors of the freshly brewed coffee from your Curtis Coffee Maker.
Understanding these steps allows you to make informed choices and ensures a delightful brewing experience with your Curtis Coffee Maker.
Serving and Maintenance Tips:
Here’s a guide to serving and maintaining your Curtis Coffee Maker:
Serving the Brew
- Pouring the Coffee: After the brewing cycle completes, gently pour the freshly brewed coffee from the carafe or drip tray into your cup or mug.
- Enjoying the Flavor: Relish the aroma and flavor of your freshly brewed coffee to your heart’s content.
Cleaning and Maintenance Routine
- Power Off and Unplug: Ensure the coffee maker is turned off and unplugged from the power source before beginning the cleaning process.
- Dispose of Used Grounds: Discard used coffee grounds from the filter or basket. Rinse the filter thoroughly for future use.
- Clean the Carafe: Wash the carafe with mild detergent and warm water. Ensure it’s completely dry before using it again.
- External Cleaning: Use a damp cloth to wipe the exterior of the machine, removing any spills or stains. Pay attention to crevices to maintain cleanliness.
- Regular Maintenance: Check the user manual for specific maintenance guidelines. Periodic descaling and thorough cleaning ensure optimal performance.
By following these serving and maintenance tips, you can enjoy a flavorful cup of coffee every time while ensuring the longevity and performance of your Curtis Coffee Maker.
Conclusion:
In conclusion, the Curtis Coffee Maker simplifies the coffee brewing process, offering a delightful experience for coffee enthusiasts. Its intuitive design and customizable features allow users to create their perfect cup of coffee effortlessly.
With user-friendly functionalities for selecting brewing preferences and an efficient brewing cycle, this machine streamlines the entire process, ensuring consistency and quality in every brew.
Moreover, by following basic maintenance routines and serving guidelines, users can prolong the life of their Curtis Coffee Maker while consistently enjoying rich, flavorful coffee.
In essence, the Curtis Coffee Maker stands as a testament to simplicity without compromising on taste. It has redefined coffee brewing, making it accessible and enjoyable for anyone seeking a superior coffee experience.
FAQs:
Can I adjust the brewing temperature on the Curtis Coffee Maker?
The temperature settings may vary. Check the user manual for specific details.
How often should I clean the machine for optimal performance?
Regular cleaning after each use is recommended.
Does the Curtis Coffee Maker support different cup sizes?
Yes, it offers options for brewing various cup sizes.
Can I use any type of coffee grounds with the machine?
It supports most types of coffee grounds, but follow the manufacturer’s recommendations for best results.
What is the brewing time for a standard cup of coffee?
Brewing time varies based on settings, usually averaging between 3 to 5 minutes.